Wednesday 29 February 2012

Math - extra activities

Today we had small math session with counting. Igor was matching bids to number rods and then assigning to them proper number. At the beginning it looked chaotically but later on we put everything in right order.

Dzisiaj mieliśmy mała sesję z matematyki w celu przypomnienia i utrwalenia liczenia. Dla odmiany połączyliśmy dwa ćwiczenia. Koraliki i Number Rods (nie wiem jak to po polsku). Igor dopasowywał koraliki do belek, licząc je i sprawdzając, a następnie przyporządkowywał do nich odpowiednią cyfrę. Najpierw odbywało się to dosyć chaotycznie, ale później ułożyliśmy to w równy rządek.


Sunday 26 February 2012

Pink tower and other variations

Today it has been a very creative day. When I asked Igor what he would like to play with, he pointed at the Pink Tower. We started to take it out on the carpet and suddenly Igor turned back to the shelf and picked up the cards for a pink tower. Originally they had number attached but I cut them off as Igor didn't know numbers at that stage. We used wooden numbers instead. Again there was a chance to put them manually and count them again. At the same Igor was matching pink cubes to the pictures and he was placing the wooden number in front of them.


Preparing the way for your child

Przygotowanie drogi

Gdy już nakierujemy nasze dzieci na właściwą drogę do czytania i pisania, stajemy się potem raczej kimś w rodzaju dyrygenta orkiestry lub przewodnika, jak kto woli. 

Dzieci pchnięte w odpowiednim kierunku, podążą same, dogonią nas a następnie prześcigną.

Tuesday 21 February 2012

Sunday 19 February 2012

Sorting colours on Ferrero Rocher


Wczoraj udało mi się zrobić ćwiczenie, które poza tym że kształci rozpoznawanie kolorów, pozwala też na ćwiczenie mięśni i koordynacji potrzebnych do późniejszego trzymania długopisu i ołówka.

Wykorzystałem pudełko po Ferrero Rocher oraz pincetę z zestawu opatrunkowego. Lepsza była by może metalowa od cukru, ale  takowej akurat nie posiadamy.
Wydrukowałem 24 kółka o średnicy kolo 28 mm i wkleiłem w plastikową foremkę po cukierkach. Jako kolorowe obiekty wykorzystałem kulki waciane z miejscowego sklepu papierniczego.

Podczas wykonywania ćwiczenia, należy zachęcać dziecko aby poprawnie trzymało pincetę, gdyż jak wszyscy będzie sobie próbowało ułatwić życie i przekładać ręką. Pamiętajmy, że rozpoznawanie kolorów jest ważne natomiast najważniejszy tu jest chwyt.


Szablon z kółeczkami...


... i foremka podczas wklejania kółeczek


A to już Igor podczas pracy.


Mała demonstracja wideo.

Colour and shapes matching

This are my home made puzzles which I've seen on Marta's blog. They were kind dear and not available locally. I decided to use my practical skills gained in primary school. I bought some wooden slats and board for a base. Cut them into pieces and glued on shapes early printed. The whole puzzle is protected with transparent foil used normally for books covering.

Puzzles can be stacked in different ways depending on imagination.


To moja manufaktura klocków które widziałem kiedyś na Marty blogu. Były dosyć drogie i chyba niedostępne. Postanowiłem przypomnieć sobie czego mnie uczona na lekcjach pracy techniki w podstawówce. Kupiłem listewki, kawałek płyty na podstawę. Pociąłem na kawałki, wydrukowałem kolorowe figury i po naklejałem na klocki. Z wierzchu zabezpieczyłem folią samoprzylepną używaną do okładania książek.

Można je układać w różnej konfiguracji. Mieszać w kolumnach i wierszach. Większe objaśnienia chyba nie są potrzebne, gdyż widać wszystko na załączonych zdjęciach.


Saturday 18 February 2012

Ten Hanger- Montessori beads 1-10

This activity is next in the line of Montessori Math Curriculum. The child counts beads on the chains and matches them to proper numbers. As all Montessori activities this one as well is multi sensorial. It helps to develop the precision of movements while hanging the chain on the hook. The child is doing muscle exercises which will help in future to hold properly pen and pencil.


To ćwiczenie jest kolejnym w Edukacji Matematycznej Montessori. Polega na liczeniu koralików i przyporządkowywaniu ich do odpowiednich liczb. Jak każde ćwiczenie Montessori działa wielozmysłowo, rozwija też precyzje ruchów reki podczas wieszania, ćwiczy mięśnie paluszków podczas chwytania koralików, które potem będą chwytać prawidłowo przybory do pisania. 

Igor ma takie tempo poznawania świata, że nie nadążam z robieniem materiału. Przykro mi, że czasami dostaje coś prosto z "taśmy produkcyjnej" a nawet nie dokończone. Ja też jestem strasznie ciekawy jak sobie poradzi z nowością, że nie czekam aż skończę daną rzecz, a daje mu w półprodukt, który już jest w części funkcjonalny. Film był nagrywany wczoraj. Dzisiaj listewka została przypięta spinaczem do starej ramki po zdjęciu ze stojakiem. Myślę, że tak zostanie. Zanim ja dorobię jej właściwe nóżki Igor pójdzie dalej. Choć za chwile będziemy wprowadzać liczby 11-20. Hmm. Przyjdzie dokręcić po jednym haczyku pod każda liczbą na łańcuszek z dziesiątką.


It should look more less like on the picture below, and maybe will be soon.

Wieszak powinien wyglądać mniej więcej jak na rysunku poniżej i być może będzie wkrótce podobnie wyglądać. Jak wyzdrowieje odwiedzę sklepik z drewienkami.


Geometrical figures

This activity I prepared long time ago. Today Igor found it on the shelf between other papers. He was very excited to see it again. Activity is based on matching plus gives the basic idea of shapes like their names. Circle, rectangle, square,  triangle, trapezoid and hexagon are used in my activity. I printed those shapes on two sheets, one white and one colour, laminated and cut off shapes from the colour sheet. Then as usual I used Velcro tapes. Without that everything would fly around the room.

To ćwiczenie przygotowałem dawno temu. Dzisiaj Igor wygrzebał je ze sterty innych papierów. To ćwiczenie sensoryczne, mające na celu dopasowanie kształtów i przy okazji dające podstawową wiedzę o ich nazwach. Koło, prostokąt kwadrat, trójkąt, trapez i sześciobok. Wydrukowałem figury na dwóch kartkach, z których jedna była kolorowa, zalaminowałem i wyciąłem figury z tej kolorowej. Jak zwykle użyłem taśmy rzepowej. Bez tego wszystko latałoby dookoła.


That gave us an idea and I took a look for other old activity which is about geometrical figures but in more curious way. 

To zachęciło nas aby poszukać innego starego ćwiczenia o figurach geometrycznych, jednak bardziej ciekawego.


Thursday 16 February 2012

Spindle box

Our home version of Spindle Box :-) I know, looks strange, but does the job. 10 pages of paper (we used pink), wooden numbers 0-9 which could be printed on paper, but we put them manually every time and practice their order and name while doing so. Instead of spindles I used simple 45 wooden sticks. This might be an idea for you. I will post video soon, when there is a proper day light to record nice one.

To nasza domowa wersja ćwiczenia zwanego Pudełko z wrzecionami. Wiem, że dla tych co już wiedzą co to jest, moje różowe karteczki wyglądają dziwnie, ale to załatwia sprawę. Użyłem 10 kartek papieru A5, pod ręką był różowy. Drewniane cyfry 0-9, ktore można poprostu wydrukować, bądź napisać na paierze. Ja miałem drewniane, co pozwala dodatkowo ćwiczyć ich rozkładanie i nazywanie na początku ćwiczenia. Zamiast wrzecion użyłem 45 kolorowych patyczków. To może byc pomysł też dla ciebie. niedługo wgram video gdy będzie dobre swiatło dzienne. Zobaczycie jak Igor sobie z nimi radzi. Narazie ja rozkładam patyczki, a on liczy i pokazuje gdzie położyć.


Znalazłem, gdzieś rysunek w domowych papierach ja to wyglada w oryginale.

I found the picture showing the original spindle box.


Description of presentation:
You need 45 elements, (spindles or stick as in my version). You take the child and make the presentation. Child should know by the time names of numbers and maybe their order. In other hands he should be aware of quantities and number shapes.
What we do is we count elements loudly and then we we put them into the proper box (place or card). When we reach 9 we have nothing in our hands and still "0" box /card empty. What we should say now is to ask the child. "Look, one box is empty. Has anything left???" When we do that for the first time, it it a surprise for your child and he will be looking around to find the "missing" stick (spindle). It is very funny situation. After a while you say. "NOTHING LEFT" because this is ZERO and zero means nothing. This will introduce your child to the ZERO number.

Opis prezentacji:
 
Potrzebujesz 45 elementów (wrzecion lub patyczków jak w moim przypadku). Zaproś dziecko i zrób prezentację. DO tej pory dziecko powinno już orientować się w ilościach a także znać nazwy cyfr i ich kolejność choć niekoniecznie. Jednym słowem, dobrze żeby dziecko umiało już policzyć od jednego do dziesięciu.
Liczymy z dzieckiem patyczki i układamy je w odpowiedniej przegródce lub na kartce jak u nas. Gdy dojdziemy do dziewiątki nie mamy nic w reku a przegródka (kartka) numer ZERO nadal jest pusta. Wtedy mówimy do dziecka ze zdziwieniem: "Zobacz jedna kartka jest pusta, Czy coś nam zostało???
Gdy robimy to po raz pierwszy, zazwyczaj dziecko zaczyna szukać dookoła, podnosi kartki pudełko. To bardzo zabawne. Po chwili mówimy. NIC nie zostało, bo to jest ZERO a ZERO znaczy NIC. Widzisz, nie ma NIC, NIC nie ma , to jest ZERO czyli NIC" Mniej więcej tak, nie musi być dokładanie, możesz użyć innych słów. Ważne aby przekazać dziecku znaczenie cyfry ZERO. Gdy dziecko ma ochotę pozwalamy mu samodzielnie wykonać to ćwiczenie. Potem zostawiamy w zasięgu ręki jak i inne ćwiczenia aby mógł w każdej chwili sobie powtórzyć.


Walentynki (Valentine's Day)

Daria made them on St. Valentine's Day.


Pink reading material - part 2


Phonetic reading material

Once your child knows the phonetic sounds and has learned to build words, you can introduce him to the Pink reading material.

As I said last time Igor prefers sticking words on a sheet with pictures so I did not use the first two steps at pink material. I will describe them a little bit and share the material with you as I prepared them all at once.

Exercises:
First step is Box of objects and cards: the child identifies and sets out the objects
(usually 6) in 2 horizontal rows. You show one of the cards which have corresponding words written on them and asked to say the sounds starting at the left. The child is encouraged to say the sounds faster and faster until a word can be heard. The card is placed below its object. The child continues until all words are read.
  • Pictures and cards: as previous exercise except pictures are used instead of objects
  • Large Pink Sheet and cards: a sheet containing 6 pictures. The child sounds out and reads the words as before, matching the cards to the pictures. (These were shown on previous post.)


Next steps are:
  • Pink Wall Lists: lists of “pink” words for the child to read. There are no pictures to act as support in reading. Lists are hung around the house.
  • Pink Booklets: small booklets with one “pink” word on every second page for the child to read.
  • Secrets Boxes: pink box containing folded pieces of coloured paper, each with a “pink” word written on it. The child takes one piece at a time and reads to him/herself, encouraging silent reading.
I created as well the activities where Igor can place the missing beginning end ending sounds.

Saturday 11 February 2012

Pink reading material - part 1

This week I've been ill, so I had plenty of time to prepare finally the Pink reading material for Igor. I decided not to buy it as prices are ridiculously high. I used picture I found in Google, as usual.


Pink Series

The pink series consist words with three individual sounds. Most commonly they are consonant-vowel-consonant words, such as cat, dog, pin, rug, mat, etc. 
Normally you should start with object-word matching and picture-word matching. I said it before that Igor loves sticking the words on the cards. If he has loose objects and words or pictures they are everywhere but not on the proper place. It is his temperament.
Igor practices reading these words. He labels pictures with words. He practices spelling all of them with the movable alphabet sometimes. We still continue the sand paper letters.

File available for downloading below.

The next step is to match the beginning and ending sounds. They will be available soon.


W tym tygodniu byłem chory więc miałem mnóstwo czasu żeby przygotować Różowy materiał do czytania. Zdecydowałem się nie kupować gotowca jako że ceny są śmiesznie wysokie. Do przygotowania użyłem obrazków wysokiej jakości znalezionych w Google.

Różowa seria


Różowa seria zawiera słowa składające się z 3 pojedynczych głosek. Większość są to kombinacje spółgłoska-samogłoska-spółgłoska np. cat, dog, pin, rug, mat, itd.

Normalnie powinno się zacząć od dopasowywania obiektów i napisów, potem obrazków i napisów. Należy to robić na stole bądź na macie. Pisałem już wcześniej, że Igor uwielbia wersję z przyczepianiem wyrazów do folderu. Gdy Igor ma w ręku kartki pojedyncze, rozrzuca ich po chwili po całym pokoju. Taki już nasz Igor ma temperament.

Igor ćwiczy czytanie tych słów. Przyczepia słowa do obrazków. Ćwiczy literowanie

wyrazów. czasami używamy ruchomy alfabet i składamy słowa z nich. Kontynuujemy pracę z literami z papieru ściernego.

Bi-lingual children, dzieci dwujęzyczne

English version below

Większość dzieci emigrantów, takich jak my są wychowywane w jednym niż jeden język. Niektórzy uczą się dwóch języków od swoich rodziców, a inni zaczynają przygodę z drugim lub trzecim językiem, gdy idą do szkoły bądź przedszkola. Dziecko może posługiwać się płynnie wszystkimi językami równie dobrze lub preferować jeden z nich. Każda sytuacja jest osobliwa.

Jeśli wychowujesz dziecko jako dwujęzyczne, uważam się najlepsze metodą jest, aby każdy z rodziców mówił tylko i wyłącznie używając swojego ojczystego języka. Pozwala to dziecku na odseparowanie języków. Nie martwcie się jeśli dzieci, szczególnie młodsze w jednym zdaniu potrafią używać sformułowań z dwóch języków. To się samo wyklaruje później. Igor obecnie tak robi. Używa tego słownictwa które jest łatwiejsze do wymówienia. Jednocześnie jest świadomy które słowo należy do słownictwa taty a które do mamy a które jeszcze pochodzi z angielskiego. Czasami chodzi sobie i mruczy pod nosem. mama - DA, tata - TAK, tata - zegar, mama czasi. 

Jeśli jeden z języków dziecka jest tym, który będzie używany w szkole, wtedy bardzo szybko zostanie przyswojony i dziecko nauczy się czytać bez dodatkowej pomocy z zewnątrz.
Dzieci dwujęzyczne są zazwyczaj bardziej uwrażliwione językowo niż inne dzieci. Badania naukowe dowodzą, że dzieci dwujęzyczne uczą się szybciej, zwłaszcza gdy obydwa języki używają tego samego alfabetu. (U nas dochodzi cyrylica). Najlepsze metodą na pomoc dziecku dwujęzycznemu jest, mówienie do niego, czytanie mu książek, zadbanie o to aby miało dostęp do audycji radiowych i telewizyjnych -- jednocześnie we wszystkich językach jakimi się posługuje. Pamiętajcie, że do wieku siedmiu lat dzieci uczę się języka najszybciej. (do 3 lat jeszcze bardziej intensywnie).

Jeśli język którego używacie w domu nie jest tym używanym w szkole, mam tu kilka rad aby wspomóc dziecko:

  • Spędzajcie czas z dzieckiem czytając mu w ojczystym języku - to bardzo ważna część tego kim ono jest.
  • Pokazujcie pozytywy drugiego języka.
  • Zadbajcie o posiadanie książek w obydwu językach
  • Dbajcie o oto aby dziecko opowiadając o szkole i znajomych używało waszego języka a nie obcego. (Będzie mu z czasem brakowało słownictwa, podpowiadajcie i wymagajcie aby powtórzyło poprawnie)
Daria posługuję się płynnie w trzema językami, czyta pisze i mówi: Polski od taty, rosyjski od mamy, i angielski ze szkoły. Do tego w szkole mają zajęcia z irlandzkiego.  Rok temu zapisaliśmy ją na dodatkowe zajęcia z hiszpańskiego i francuskiego. Pół godziny po szkole raz w tygodniu. Okazało się po 3 miesiącach, że Daria nauczyła się sama 20 lekcji do przodu słuchając CD i czytając książkę. Zaczęła nudzić się na kursie. Byliśmy zmuszenie zareagować i poprosić nauczycieli o zajęcia indywidualne. Od roku ma raz w tygodniu korepetycje z francuskiego i od tej jesieni z hiszpańskiego. Bawi się świetnie.

Jako podsumowanie mojego posta napisze: Nie zabraniajcie waszym dzieciom dostępu do wiedzy. Wykorzystujcie ich potencjał.

********************************************************

The majority of immigrants' kids are raised in multilingual society. Some of them learn two languages from their parents, others start their journey with second or third language in the school. The child may use fluently all the languages or may prefer one of them. Each situation depends on the family.
If you are growing the bilingual child, I consider, the best way is, that both parents are using only their native language. It allows the child to separate the two languages. Don't be worried if at the beginning your child uses words from two languages in one sentence. It changes with time. Igor does it now. He uses  vocabulary from that language which one is more easy for him. At the same time he is conscious which word actually belongs to dad's vocabulary, which is mum's and which comes from English.
Bilingual children are usually more sensitive to language than others. Research show that they learn faster, especially when both languages use the same alphabet. ( We have Cyrillic in addition in Russian) The best method to help your bilingual child with learning is to read books to the child in both languages, making sure they have access to CD's and TV in all languages at the similar level. Remember that your child learns languages better before the age of 7, and best by the age of three.

If language which you speak is not that one school uses I have advice:
  • read to the child in your language
  • show the advantages of the second language
  • have books in both languages
  • ask your child to speak about what happened in school only in your language. If there is lack of words, tell him what he should say and ask to repeat correctly.
Friday 10 February 2012

Life cycle

Today Daria learned what is the Life Cycle. As an example we used a pumpkin and an apple. 3 part cards for memorizing the nomenclature and then to put them in the proper order constructing the life cycle.


I found them on: montessoriforeveryone.com
Direct links to the files: pumpkin, apple


Saturday 4 February 2012

Picture word matching


That activity is what left after we were learning phonics. We have three of those folders. In few next days I am going to prepare the pink reading material and we start learning it.

Ta zabawa została nam z czasów gdy uczyliśmy się literek fonetycznych z alfabetu angielskiego. Mamy 3 takie foldery. W ciągu najbliższych dni zamierzam przygotować różowy materiał od czytania i zaczniemy z nim pracę.

Friday 3 February 2012

Wyszywanki

Wyszywanki Darii: Pizza, kanapka i dzisiaj wykonana szklanka lemoniady.


Number rods.

These are ten wooden rods varying in length. Each rod is coloured in an alternating red and blue pattern. The first rod is red. The second, divided into two sections, is red and blue. The rods go on until the last rod is divided into ten sections. We have the shorter version of them. Number rods are the next step after Red rods, which are the same shape and just red colour.

There are few exercises with number rods. You can start with mixing the rods on a mat. Ask your child to build them into a stair, starting from shortest to longest with the red rods even on the left side.

After that, you can use the 3 period lesson. Introduce each of the rods naming it number. Point to one and say, “This is one.” Point to two and say, “This is two.” Then pointing with your finger count the sections, “one, two.” Start with 2 or 3 number rods to begin with. Add number rods as your child masters the lesson. Repeat until your child really understands counting and the association of numbers to the rods.


Thursday 2 February 2012

Handwriting

Recently I have been looking for the theoretic information regarding handwriting. It was caused by that I had to chose the font for Igor's sand paper letters. At the end a cursive used in Polish schools won. I didn't choose the English type of cursive as: first I don't know it well as I had never been thought how write it, and second Irish school system does not use cursive until third grade anyway, so when kids are 10 years old. Children are thought to write ball and stick style. Which by the way I consider a disaster. It caused us the big problem while Daria was learning to write. She was the best example that this type of writing is not the best we have. She was in a habit of mixing up b-d, p-q. The others where mirrored. It lasted for two first years in school (Junior infants and Senior infants). This year on vacation I started to teach her Polish style of writing which is used in all school since I remember. She was doing very well. Her writing was getting better and better every day.


When school started in September kids were given notebooks for practising a spelling. The task is given every week: 10 words to write twice and then to make 10 sentences using those words. I need to find that workbook and give here the example of how big difference it is between ball and stick writing in single line sheets and cursive in our home workbooks.

And there we are.


 I decided something has to be done. I asked Daria's teacher whether it would be possible to change her type of writing to cursive and change the notebook to 3 line one. She agreed. Since that day Daria's homework started to look much better.

This is a week later.


We keep this way until today.

I would like to share with you some information I found two days ago.

Samuel L, Blumenfeld in the work "How Should We Teach Our Children to Write?
Cursive First, Print Later!" writes:

[...] The question then becomes: How shall we teach children to write? And my answer is quite dear: Do not teach your child to print by ball-and-stick, or italic, or D’enelian. Teach your child to write a standard cursive script. And the reason why I can say this with confidence is because that’s the way I was taught to write in the first grade in a New York City public school back in 1931 when teachers knew what they were doing.
In those days children were not taught to print. We were all taught cursive right off the bat, and the result is that people of my generation generally have better handwriting than those of recent generations. Apparently, cursive first went out of style in the 1940s when the schools adopted ball-and-stick manuscript to go with the new Dick and lane look-say reading programs. Ball-and-stick was part of the new progressive reforms of primary education.
But ball-and-stick has produced a handwriting disaster. Why? Because by the time children are introduced to cursive in the third grade, their writing habits are so fixed that they resent having to learn an entirely new way of writing, the teachers do not have the time to supervise the development of a good cursive script, and the students are usually unwilling to take the time and do the practice needed to develop a good cursive handwriting.
 The result is that many youngsters continue to print for the rest of their lives, some develop a hybrid handwriting style consisting of a mixture of print and cursive, and some do develop a good cursive because they’d always wanted to write cursive and had been secretly practising it for years without their teachers’ or parents’ knowledge.
Apparently, all of those schools that introduce cursive in the second or third grade must believe that it has some value, or else why would they teach it at all? The problem is that by requiring the students to learn ball-and-stick first, they create obstacles to the development of a good cursive script.
  The reason for teaching ball-and-stick first, we are told, is because first graders do not have the motor skills or muscular dexterity in their fingers to be able to write cursive at that age. But that argument is totally false. Prior to the 1940s virtually all children in public and private schools were taught cursive in the first grade and virtually all learned to write very nicely. All were trained in penmanship and did the various exercises - the ovals, the rainbows, the ups and downs - that helped us develop good handwriting. We were also taught how to hold the writing instrument (or stylus) correctly, cradled between the thumb and the forefinger (also known as the index finger) with the tip of the writing instrument resting on the long finger next to the forefinger, in a very relaxed position, enabling a writer to write for hours without tiring.
On the other hand, when a child is taught to print first, the writing instrument is held straight up with three or four fingers in a tight grip with much pressure being exerted downward on the paper placed in a straight position. When these children are then taught cursive in the second or third grade, they do not change the way they hold the writing instrument because a motor or muscular habit has been established that is not easy to alter.
That is why so many children develop poor cursive scripts because of the way they hold their pens. Children do not easily unlearn bad habits. Which is why I tell parents that there are two very important no-no’s in primary education: do not teach anything that later has to be unlearned, and do not let a child develop a bad habit. Instruct the child to do it right from the beginning.

Cursive Helps the Left-Handed
Also, it may surprise the reader to learn that left-handed children gain special benefits from learning cursive first. When left handed children are taught ball-and-stick first, their tendency is to use the hook position in writing since the stylus is held straight up and the paper is also positioned straight. This means that, as the child proceeds, printing from left to right, the child’s arm will cover what has already been written. This can be avoided if the left-handed child learns to write from the bottom up, the way right-handed children write. But this is difficult, if not impossible, to do when printing ball-and-stick.

However, if a left-handed child is taught to write cursive first, he or she must then turn the paper clockwise and must write from the bottom up, since it is impossible to use the hook position if the paper is turned clockwise. Right-handers, of course, turn the paper counter-clockwise. But left-handers are quite capable of developing as good a cursive handwriting as any right-hander by writing from the bottom up. (In fact, the secret of good handwriting may be in the position of the paper.)

All of this must lead to one simple conclusion: teach cursive first and print later, There are few things that help enhance a child's academic self-esteem more than the development of good handwriting. It helps reading, it helps spelling, and because writing is made easy, accurate, and esthetically pleasant, it helps thinking. As Francis Bacon once said: “Reading maketh a full man. . . and writing an exact man.”
This article is from The Blumenfeld Education Letter, Vol. 9, No. 9 (Letter #97), September 1994. Editor: Samuel L. Blumenfeld.


I would be grateful for any opinion regarding hand writing.

Wednesday 1 February 2012

Math's lesson

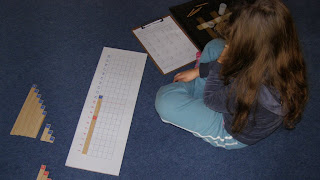
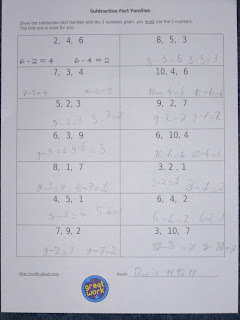
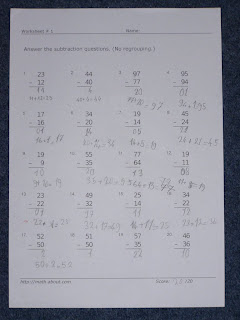
Today Daria didn't go to school as she felt not well in the morning. She got fine later on. Before the afternoon we had a short maths lesson. Adding and subtracting with regrouping in the range 0-100.

At this stage she counts on paper calculating in her mind and then she checks it on the bids and/or subtraction board if she feels unsure. We introduced some multiplying last year but had no time to continue.
 

Dzisiaj robiliśmy z Darią odświeżenie dodawania i odejmowania w zakresie 0-100. Na tym etapie Daria oblicza pod kreską a następnie sprawdza używając łańcuszków z koralikami i montesoriańskiej tablicy do dodawania i odejmowania. W zeszłym roku wprowadziliśmy też elementy mnożenia ale nie było czasu rozwinąć tematu.


For this acvtivity we used printouts from math.about.com 

Polecam stronkę z gotowymi przykładami http://math.about.com/


There is big mistake, according to me, in Irish primary school curriculum that adding is introduced separately from subtracting. Half year is wasted. Kids learn adding 0-100 in first half year. Then in February they start subtracting 0-100. What I prefer is teaching kids both them together, or subtracting the next day after introducing addition and it has been understood by the child.

For example.

3+4=?
4+3=?
3+?=7 How much we need to add to 3 to make 7?
4+?=7 How much we need to add to 4 to make 7?

7-4=?
7-3=?
7-?=4 How much we need to subtract from 7 to make 3?
7-?=3 How much we need to subtract from 7 to make 4?

I consider when you do it in that way it gives the child the wider understanding of what is happening. Daria is now 7 now and when about two years ago I started to teach Daria to add and subtract numbers we didn't have the Montessori sets yet, so we worked on home made counters.